Sending visitor variables (Javascript)
Notice
If you have the Transparency & Consent feature implemented, see how it affects visitor variable behavior from Transparency & Consent documentation
Overview
You can attach key value pairs to a visitor with giosg JavaScript API. This data then becomes available to agents in giosg chat and in reporting. Submitted data can also be signed so that you can trust that it originated from you and was not tampered with by the visitor.
Prerequisites
Using giosg visitor JavaScript API requires loading the latest version of giosg script tag on the site.
JavaScript API can be used in two ways: asynchronously with _giosg object, or by calling API method’s directly. _giosg object becomes available right after the giosg script tag, so you don’t need to wait for giosg to fully load before making API calls.
Sometimes, however, it is useful to know when the API calls complete. For that reason you can also call giosg API methods directly and receive jQuery promise as return value. When calling API methods directly it is important to wrap your code inside _giosg(function () { ... }); to certify that the giosg client is fully loaded before the call is made.
The following API calls are identical:
1 2 3 | |
This documentation uses only asynchronous versions of API’s as examples from this point on. To “convert” asynchronous call to normal API call use following pattern:
1 | |
Use the following helper script for all submits. This removed the need to hardcode the room id to every call. Without including the room info, variables are only submitted to the domain room and will not be visible in the chat if you use custom rooms. The
roomlistarray will be passed as a parameter in the actual submit call.
//PLAIN HELPER FOR ROOM JS const roomList = giosg.rooms.map(i => ({"id": i}))
Available parameters
_giosg('visitor', 'submit', <variables>, <signing_algorithm>, <replace_existing>, <room_information>);
| Attribute | Type | Required | Description |
|---|---|---|---|
variables |
object | required | JSON serializable object containing key value pairs. Object can contain attributes of any names. username and avatar attributes have special meanings. username is displayed as visitor’s name in chat dialog and reports. Example: { "username": "John Doe" }. The avatar variable contains the url for an image that then displays in giosg with the visitor’s username. Example: { "avatar": "https://example.com/test.png" }. Prefixing variable name with double underscore (__example) makes it hidden in user interface. |
signing_algorithm |
string | optional | String identifying which algorithm is used for signing. Default is ‘plain’ which means no signing. See full list of supported algorithms below. |
replace_existing |
boolean | optional | If set to true, replaces existing data that was attached to visitor. Otherwise, existing data will be extended with new values. Default is false. |
room_information |
array | optional | Array of room information objects. This parameter controls to which room the data will be connected. If not set, defaults to domain room. Room info object must contain either id or name attribute. Example: [{ name: 'My custom room' }]. Use the helper script provided in the beginning of this document to avoid hardcoding these values. |
Special variable names
There are few special cases with variable names.
- If variable is named
usernameit will be shown as a visitors name in the Giosg UI. - If variable is named
avatarand contains valid url, that will be used as a visitors avatar image in Giosg UI. - If variable name is prefixed with double underscore, it will not be rendered to Giosg UI. This is usefull if you want to for example store some JSON object to visitor variables for system use. Example
__im_hidden_variable.
Supported signing algorithms
| Algorithm | Type | Description |
|---|---|---|
HS256 |
JWT | HMAC using SHA-256 hash algorithm (recommended) |
HS384 |
JWT | HMAC using SHA-384 hash algorithm |
HS512 |
JWT | HMAC using SHA-512 hash algorithm |
Submitting variables to the chat
You can bind to visitor variables, for example, login information about a visitor and send it to the chat. You should bind values found on your page and send them to the chat - below is an example of how the whole submit function can look:
1 2 3 4 5 6 7 8 9 10 11 12 13 14 | |
Signing visitor variables
Signing is used to verify that submitted variables are not altered by a web page’s visitor. If signing is required for a domain and the checksum is wrong or not set, then giosg will reject incoming variables and return a 400 HTTP status.
Variable signing is done through JSON Web Token specification (JWT). JSON Web Token specification is recommended with HMAC SHA-256 hash algorithm.
Please note that signed variables can be still seen by the visitor but cannot be modifed in any way without giosg detecting the modification and rejecting the variables.
Setup in giosg account for signing
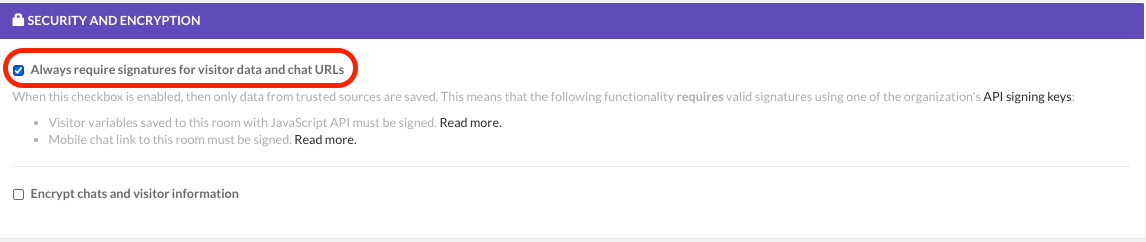
To require that only signed variables are accepted in your giosg room, enable the feature by navigating to: Settings -> Rooms -> {room_name} -> Security and Encryption -> tick the checkbox below the text: "Always require signatures for visitor data and chat URLs"
API signing key
The API signing key for signing the visitor variables needs to be created in your giosg account, under Settings -> Company -> "API Signing Keys". On this page, click the "Generate new signing Key" button to create a new key.
Remember to store this key safely and not expose the key to your front-end. If exposed, it could be used to alter submitted data.
Generating the payload
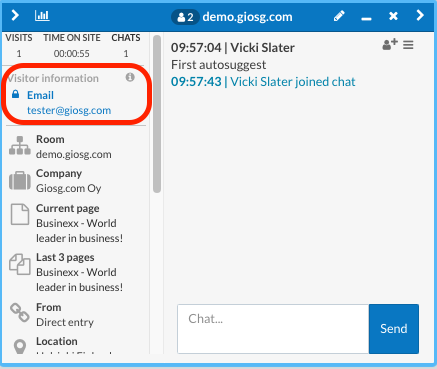
Below is an example how to create the jwt-signed payload in python and nodejs. The data we are sending in the example is: Email: tester@giosg.com
1 2 3 4 5 6 7 8 9 10 11 | |
1 2 3 4 5 6 7 8 9 10 | |
Submitting the jwt payload to the chat with javascript
1 2 3 4 5 6 7 8 | |
This is how submitted variables looks in the chat window, please note that when the lock icon is blue it means that the data is signed correctly:
Remove submitted variables and end the chat-session on logout
Usually visitor variables are set when the visitor logs in to your page. It is strongly recommended to also remove these variables when the visitor logs out. To remove the variables from all of your rooms please use below javascript call. For this call you need a list of all of your room ids (this list can be skipped if you are only using the domain room)
Hint: In situations where removing variables doesn't work, it may be caused by the request not going through before there was a redirect. To prevent this, add a small delay before the redirect or use the asynchronous version that returns a promise, then perform the redirect after log out.
1 2 3 4 5 6 7 8 9 10 11 12 13 14 15 | |
Conclusion
In this tutorial we went through the process of submitting extra information about the visitor to the chat and the optional (still recommended) methods for signing the data and removing submitted information after the chat. If your you would like to do this same process through rest-api's, please follow our Visitor HTTP API Reference.