Interaction Builder JS API
Overview
Interactions runtime Javascript API can be used to interact with interactions at runtime, specify custom code to run when interaction starts and listen for events.
Interaction Designer provides a Javascript editor for entering custom Javascript code that runs when the interaction starts. This document describes how to access the editor and customize interactions using a Interaction Javascript API provided by giosg.
We will also cover other uses of Interaction Javascript API, like listening events from live interaction on your page.
Prerequisites
Before you can use interaction runtime API, you need to have active a Giosg account. Additionally you should be familiar with Giosg Interaction Designer and have at least one interaction created.
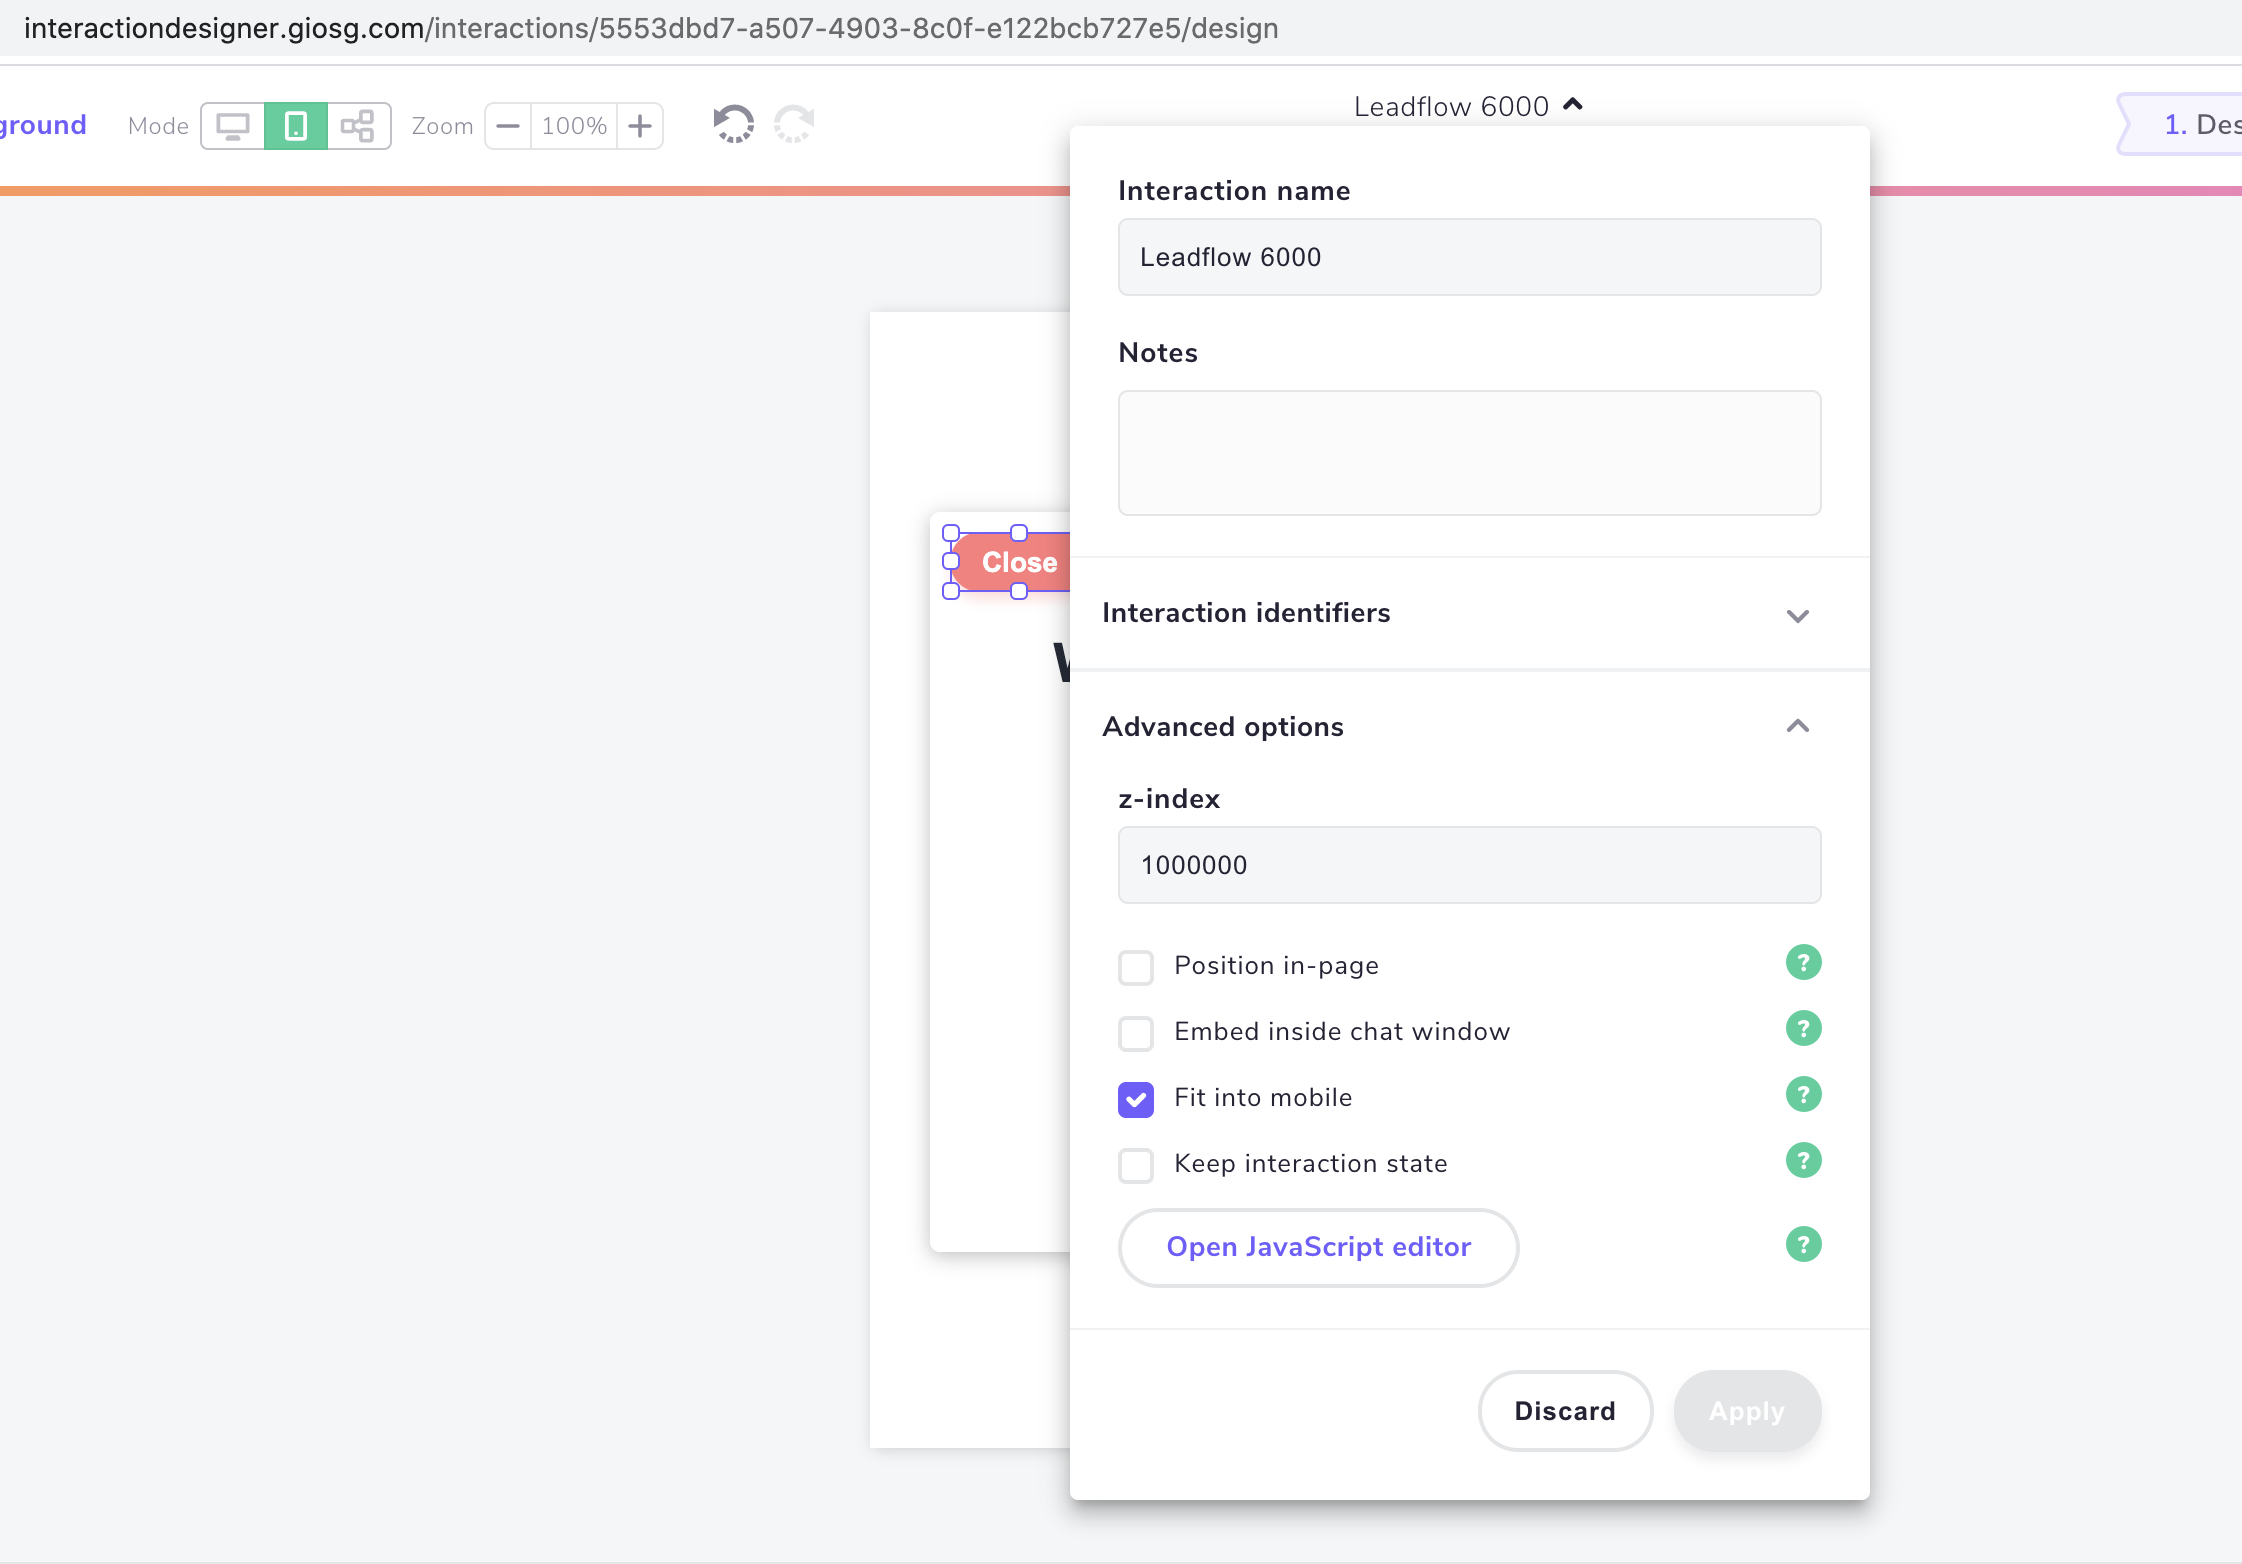
Using Interaction Designer JS Editor
To get started, navigate to https://interactionbuilder.giosg.com and select one of your existing interactions or create a new one.
When you have your interaction open, you can open the Javascript editor by clicking the name of the interaction at the top center of the view, then clicking open the "Advanced Options" section and finally clicking the "Open Javascript editor" button.
The interaction runtime JS API is accessed via a top-level global JavaScript object, $i. It provides access to the interaction views, elements and any parameters that are passed to the interaction.
| Attribute | Type | Description |
|---|---|---|
$i.views |
object |
Access interaction views, for example $i.views.MyFirstView |
$i.elements |
object |
Access interaction elements, for example $i.elements.SubmitButton |
$i.urlParams |
object |
Access url parameters |
$i.dataFields |
object |
Access the interaction custom data |
shown |
boolean |
Allows to hide or show the interaction |
zIndex |
number |
Allows to change or read z-index value |
Interaction view and elements are available by their name. For example, to access a button whose name is “MyButton” in Interaction Designer, you should use following code:
1 | |
Elements whose names contain whitespace characters are accessed by replacing the whitespace characters with underscores. So for example element named "Close button" would be accessible with like this:
1 | |
Element API attributes
Different elements support different kinds of attributes that you can get and set. They are described in the following table.
| Element type | What can be get & set | Attribute | Type |
|---|---|---|---|
| All elements | Element visibility | visible |
boolean |
| All elements | Disabling element | disabled |
boolean |
| Text input elements | Input value | value |
string |
| Text label elements | Text contents | text |
string |
| Buttons | Button text | text |
string |
| Images, Videos | Image or Video source URL | url |
string |
| Checkboxes | Checkbox state, checked or not | checked |
boolean |
Radio and Select elements API attributes:
| Attribute name | What can be get & set | Type |
|---|---|---|
value |
Index of the selected option, starting from 0 (zero) for the first option | boolean |
options |
Array of options / labels | string[] |
So to set text input named "EmailAddress" value to "test@test.com" and checking checkbox named "Receive emails" would happen like this:
1 2 | |
Element API methods
Different elements support different kinds of methods which can be used to get information or to control them. They are described in the following table.
| Element type | What can be get & set | Description | Type |
|---|---|---|---|
| All elements | isClicked() |
Has element been clicked | boolean |
| Views | switchTo() |
Switch to view in question | boolean |
| All elements | applyThemeStyle(name) |
Applies predefined style to the element | void |
| All elements | addEventListener("click", () => {}) |
Sets up a click listener that will trigger on element click | () => void; Unsubscribe function that will remove event listener when called |
To check for example if element named "HelpButton" has been clicked at least once during this pageview:
1 | |
To use applyThemeStyle method you need to:
1. Define theme style for required element type with specific name
2. Call the method with the name of the style
For example: You've created a theme style for a button element and called it "error". To apply this style to any button you would have to use this code
1 | |
Live interaction runtime events
When interaction has been published and is loaded to webpage, it will emit events that can be listened on customers page.
Every interaction check's if window.onGiosgInteractionEvent function exists. If so, then they will call this callback function whenever any of the live interaction events gets emitted.
The event handler function (onGiosgInteractionEvent) must return Promise, otherwise an error will be logged to browser console. When callback function is properly implemented to return a Promise, interaction will wait for that promise to resolve before continuing (unless stated otherwise). Note that if the callback returned Promise rejects, interaction will continue executing.
Giosg does not implement timeout for the returned Promise and it is left for the developer to handle. We highly recommend that the returned promise would not to take more than 1000 milliseconds to be resolved in order to guarantee good end user experience.
Example code for listening for interaction events:
1 2 3 4 5 6 | |
List of live interaction events
| Event type | Description |
|---|---|
interactiondesigner:changeview |
Emitted when interaction view changes |
interactiondesigner:exit |
Emitted when interaction gets closed |
interactiondesigner:formdata |
Emitted when form is submitted |
interactiondesigner:click |
Emitted when any element gets clicked |
interactiondesigner:start |
Emitted when interaction is shown for the first time |
interactiondesigner:ready |
Emitted when interaction is ready to be shown |
Change view
This event is triggered whenever there is a change from one view to another. The viewHistory will be a list of view ID's sorted from oldest to newest visited views. The viewHistory will exclude the to attribute but include the from attribute of the same event.
It is possible that the viewHistory can be shorter than the previous events viewHistory. This indicates that the user is going back through views. Consider view history to be a history stack, going back in the stack will pop the last item of the list and show that again.
Example:
1 2 3 4 5 6 7 | |
Exit
This event is triggered when the interaction is closed.
1 2 3 4 | |
Form submit
This event is triggered when a form is submitted.
The formData will be an object the that represents the input names and their values at the moment of submit.
The elementLabel attribute is elements label in case the element type support's it, otherwise undefined. Currently label is supported for button and text type elements.
The elementType attribute can be one of button, input, radio, select, text, image, checkbox or video.
1 2 3 4 5 6 7 8 9 10 11 12 13 | |
Click
This event is triggered whenever any element within the interaction is clicked. This even triggers when the element does not have any action assigned to it.
The click event can trigger twice very shortly after each other. This happens when the top most element doesn't have any click action on it, in that case the user will click through the element, but the clicked through element will still trigger an event, the clickHistory will also include the clicked through element.
The clickHistory will also not be a unique list. If the interaction user clicks the same element twice, the list will contain the same identifier twice.
The elementType attribute can be one of button, input, radio, select, text, image, checkbox or video.
The elementLabel attribute is elements label in case the element type support's it, otherwise undefined. Currently label is supported for button and text type elements.
The urlActions attribute will be a list of all "url actions" that the element has. Each object in the list will have type and targetUrl attributes. Possible choices for type are opentab which would open new browser window, redirect which redirect user to new url, and get or post which means that XMLHttpRequest is made to given url.
1 2 3 4 5 6 7 8 9 10 11 12 13 14 15 | |
Start
This event can be used for example as an impression indicator. It let's you know when a certain interaction is started, eg. shown to the user.
Even though the window.onGiosgInteractionEvent should still return a Promise for this, the code won't wait for the promise to resolve. This is done deliberatly to ensure it doesn't affect the end user experience.
1 2 3 4 | |
Ready
This event is fired when interaction script was initialised and is ready for work.
1 2 3 4 | |
Interaction window JS API and preventing auto startup
When interaction script is loaded with preventAutomaticStartup=true query parameter (https://{UUID}.interactions.giosgusercontent.com/live.js?preventAutomaticStartup=true) interaction won't start automatically. To show the interaction you'd have to use it's global API that becomes accessible in window.giosgInteractions object after interactiondesigner:ready event is fired.
1 2 3 4 5 | |
API Usage examples
Customize an interaction based on URL
Customize an interaction based on URL or chat attachment parameters. This example maps parameter names to interaction element names.
1 2 3 4 5 6 7 8 9 10 11 | |
Change a view
This example shows how to change a view from custom JS code.
1 | |
Pass data to interaction from within the web page
Any data can be passed to an interaction from the customer’s website page using a global JavaScript object. For example by attaching data to the global “window” object, so that an interaction made with Giosg Interaction Builder can use custom data feature to read that data and when visitor submits a form that custom data will also be submitted. This is useful for example sending some account information that the window object / page scope has.
Here, the name of the property attached to the window object could be for example “myCustomData”.
1 2 3 4 5 6 | |
Then go navigate on interaction builder to custom data fields Click interaction name on design/preview -> Custom data fields
After that use javascript to set the data to custom datafields.
1 2 3 4 | |
Now when visitor submits the form you will see the custom data in form data.