Building integrations with Workflow Builder
Building logic
Workflow Logic is built in the WFB Logic Editor using Logic Blocks.
Using Logic Blocks
Logic is constructing by connecting Logic Blocks to the Start Block. Connected logic blocks form a Logic Stack that can be run.
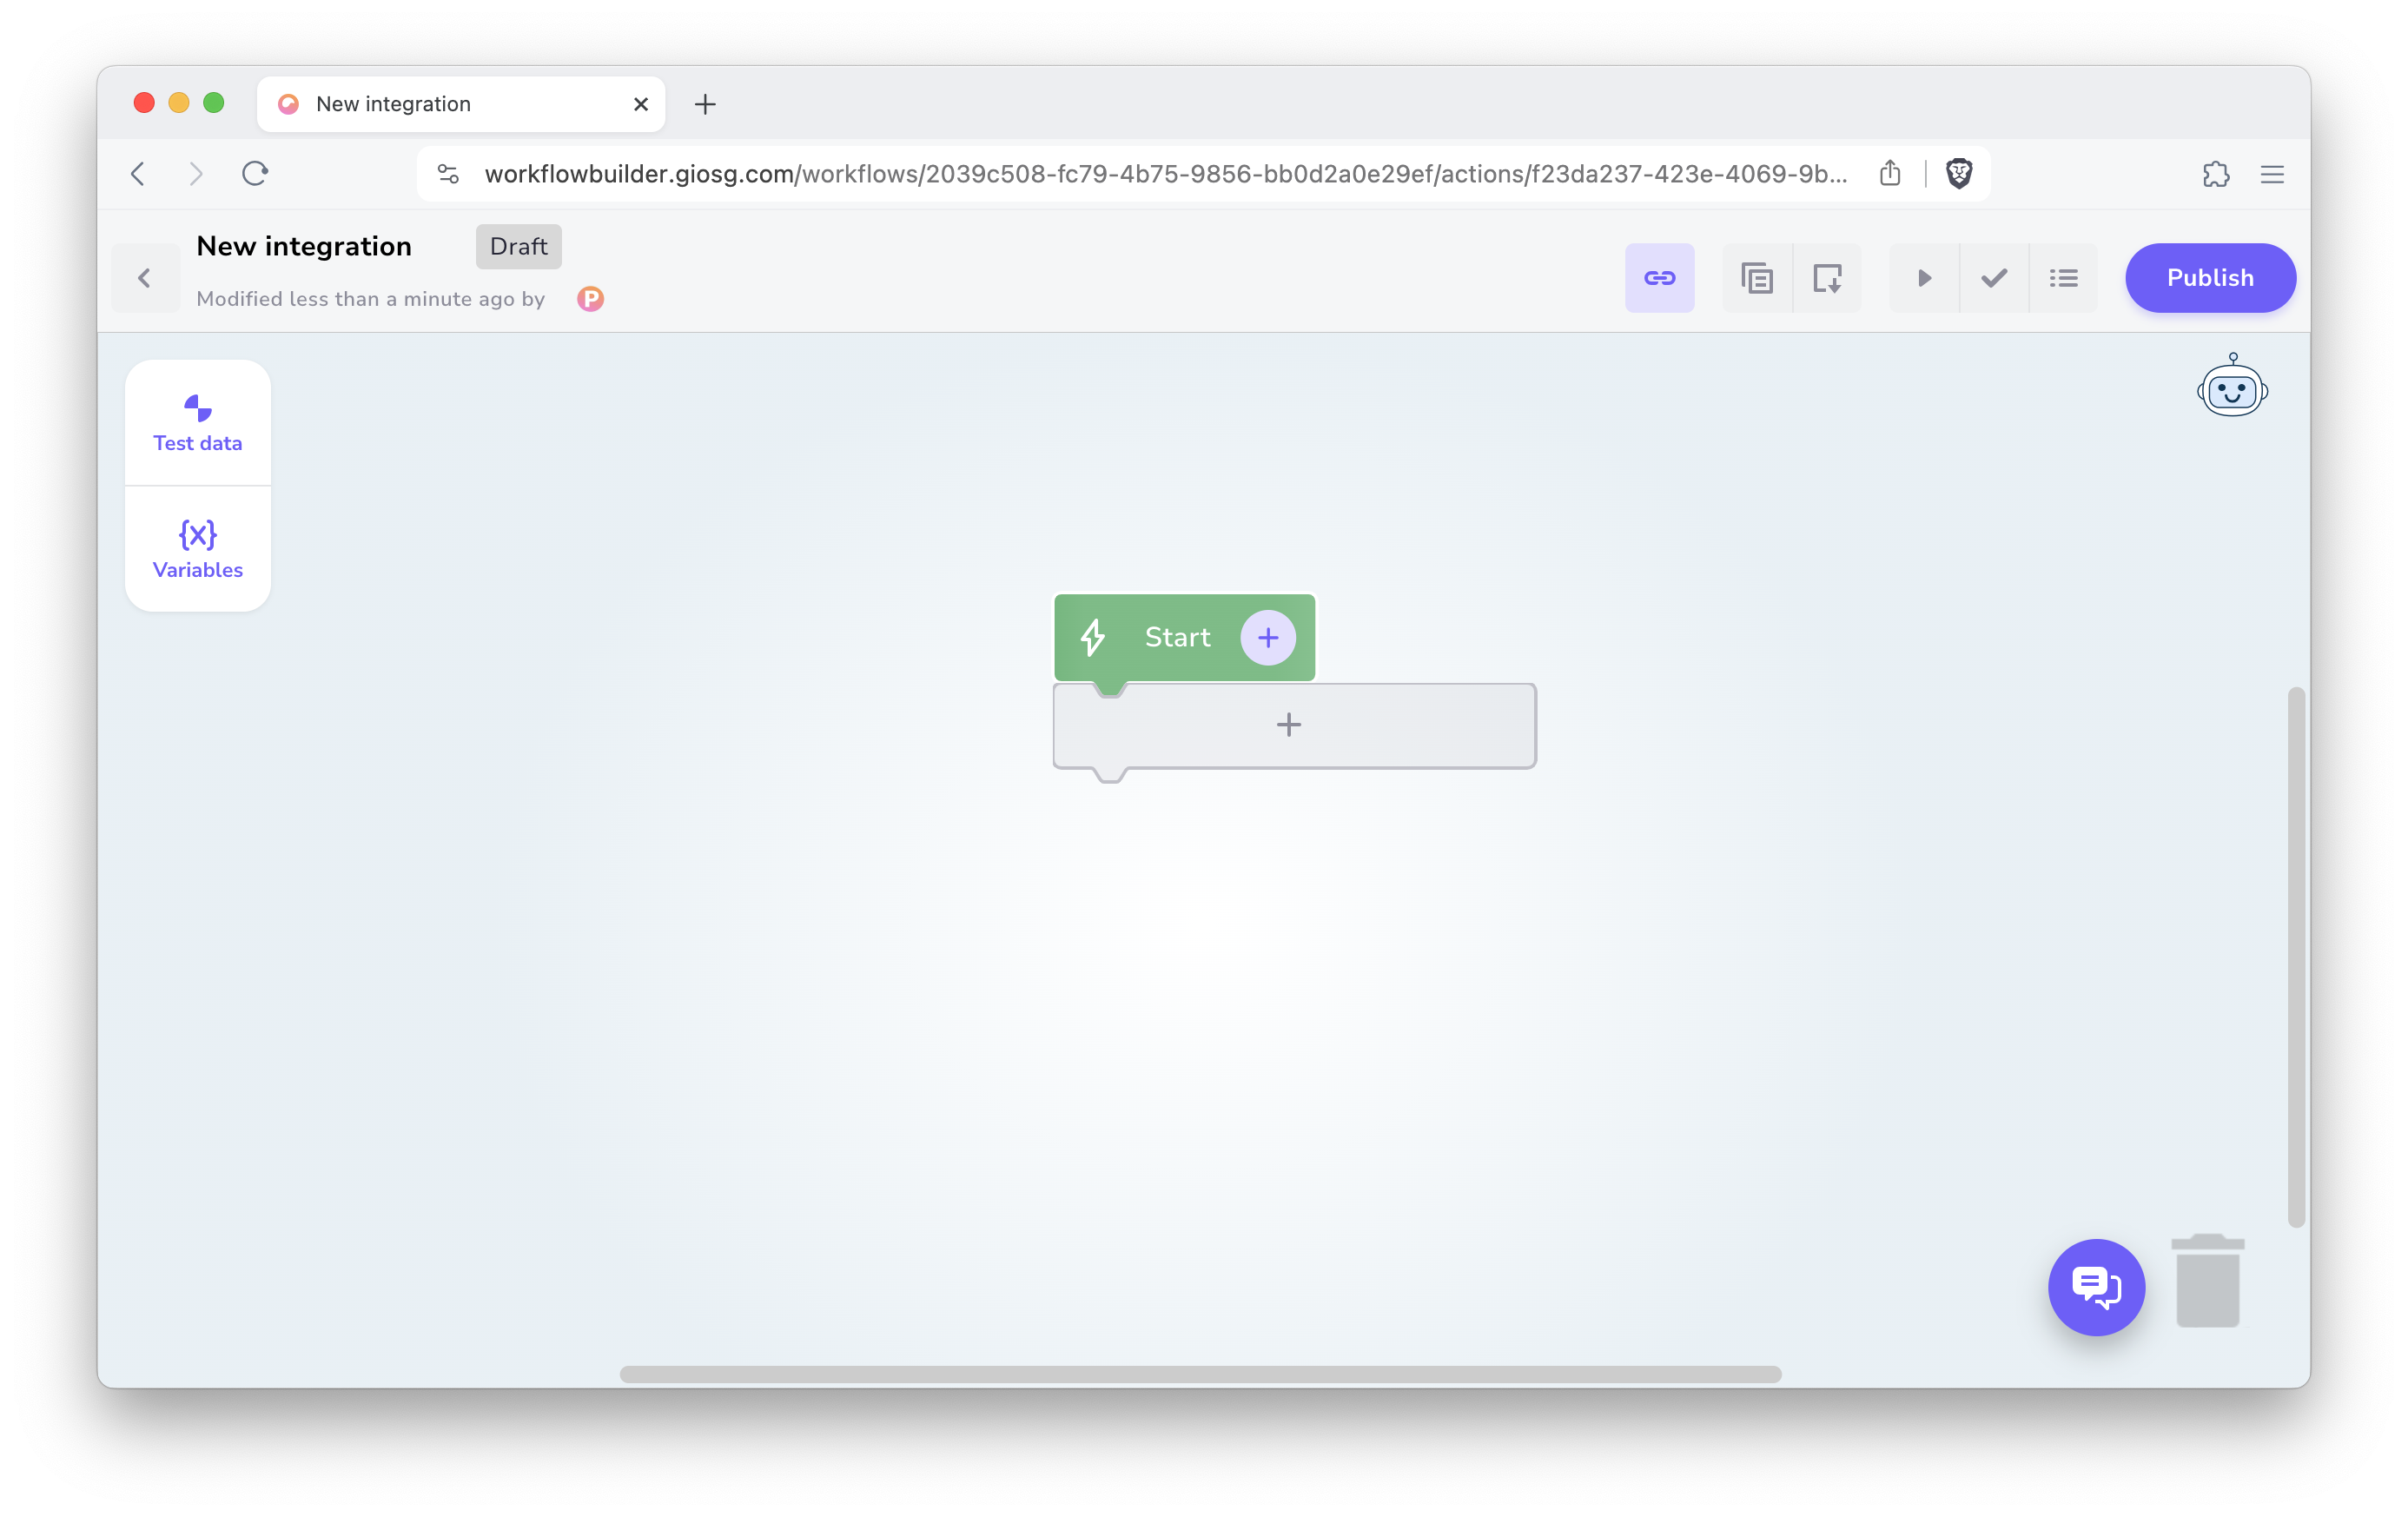
Blocks can be selected from the Logic Block Menu available via the add button at the end of stack, or via via right mouse click anywhere on Logic Editor Canvas.

Blocks not attached to the Stack are not executed so the rest of the Logic Canvas can be used as a scratchpad.
Using expressions
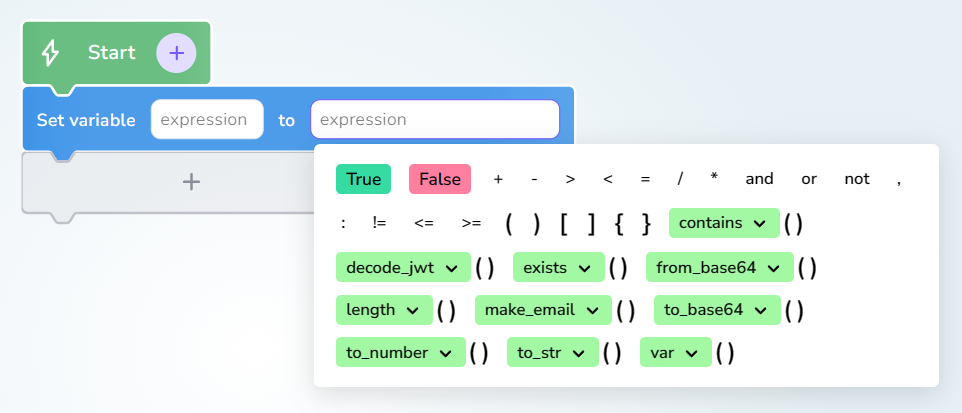
Some Blocks have Expression Fields that can contain for example basic comparisons for numbers and strings. In these blocks, Expressions are typed with the keyboard into Expression Fields of the blocks. Entered input is automatically converted into visual Expression Chips.
Expressions can be created using the following:
- variables created in the UI that appear in the Variables Panel on the left
- input variables passed manually or at runtime when workflow is triggered
- common math and logic operators such as
+(also for text),or,andetc. - expression functions (see below for a full list)
Variables whose values are data structures can be accessed using square brackets notation. Let's presume myvar contains following dictionary/map value:
1 2 3 4 5 6 | |
For example, to access the value of its deepest leaf key, myvar[topkey][secondlevelkey][leaf] would then be used to get it. For getting the value of the first element of myarr, myvar[topkey][myarr][0] would be used.
As you type, the system automatically suggests chips to you. The suggestion menu can also be opened by pressing Ctrl+Space on the keyboard. If there is only one item in the menu, the Space key can also be used.
To select a suggestion, press the Enter or Tab key to choose the best match that is shown first, or choose from any of the matches shown using your mouse.
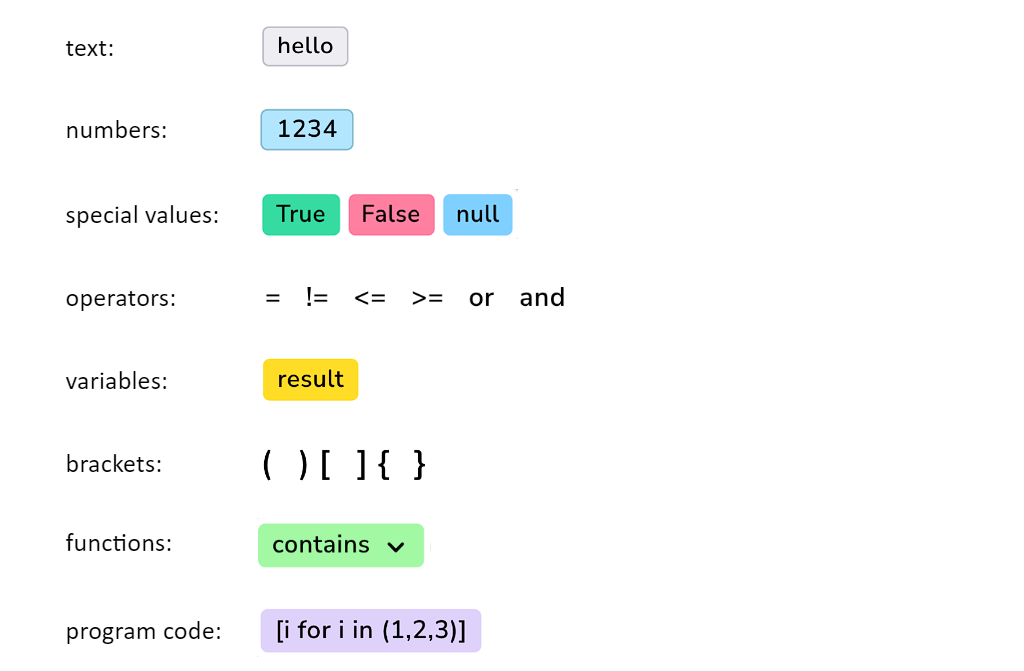
As the example shows, there are different kinds of chips to indicate different parts of the expression. There are chips for:
The following Expression functions are provided:
contains(collection, value) ➞ bool: Check whether collection contains value.
decode_jwt(str token, str key) ➞ any: Decode JWT token and return JWT token payload.
exists(str name) ➞ bool: Check whether variable exists.
length(value) ➞ int: Get length of any collection.
to_base64(any | null value) ➞ str: Convert any value to base64 encoded string.
from_base64(data: str, /) ➞ Any: Decodes a base64 encoded string and returns it as a dictionary (if JSON) or string.
to_number(str value) ➞ float | int: Convert string to integer or float number.
to_str(any | null value) ➞ str: Convert any value to string.
var(name) ➞ any: Accessor for variables whose names contain e.g. whitespaces
make_email(to: str, subject: str, content: str, add_date: bool = True) ➞ str: Creates a 'quoted-printable' UTF-8 encoded HTML email message encoded into a URL- and filesystem safe base64 encoded format, suitable for sending via Gmail API as raw email message.
hash(value, str mod = "SHA256") ➞ str: Hashes value with given hash algorithm
value can be any JSON serializable value
mod can be one of the following: MD5, SHA1, SHA224, SHA256, SHA384, SHA512. If omitted "SHA256" is used
returns a hex digest
hash_hmac(str key, value ,str mod = "SHA256") ➞ str: Keyed-Hashing for Message Authentication, HMAC as described by RFC 2104
key is string giving the secret key
value can be any JSON serializable value
mod can be one of the following: MD5, SHA1, SHA224, SHA256, SHA384, SHA512. If omitted "SHA256" is used
returns a hexdigest
Datetime related expressions:
datetime_now : Returns current timestamp (UTC) as a python's datetime object. All of it's methods are available for advanced use cases
- to get ISO-8601 string representation, user can call an str function on a variable containing datetime obj.
- datetime objects support comparison operations and subtraction to find the time difference between them, as a timedelta object
- in the execution results, datetime object has following representation "datetime(2024-05-20 07:40:07.940000+00:00)"
datetime_fromisoformat : parses ISO-8601 string to a datetime object.
datetime_timedelta : returns timedelta object. Function has following signature:
1 2 3 4 5 6 7 8 9 10 11 12 13 14 15 16 17 18 19 20 21 22 23 24 25 26 27 28 29 30 31 32 33 34 35 36 | |
Note
- timedelta objects can be added or subtracted from datetime objects to get a new timestamp
- these objects have following representation in the execution results "timedelta(8602 days, 1:10:07.940953)"
Making HTTP connections
HTTP requests originate from out.giosg.com. Source IP addresses for all outbound HTTP traffic from giosg are documented in docs.giosg.com.
Making authenticated requests
Simply choose the connection (authentication) to use from the dropdown menu. All the connections created in your organization are available.
Setting HTTP request URL, headers and body
Enter the request URL as a quoted string into the URL field of the HTTP block.
Headers are entered as a {"name":"value", "name2":"value2"} dictionaries with both header names and values as quoted string values. Variables are left unquoted.
For HTTP body, enter the content and choose the HTTP body type from the ones that are available:
- JSON (application/json)
- XML (application/xml)
- Form (application/x-www-form-urlencoded)
Note
Form data is entered as key=value pairs, one per line. Enclose variables inside double curly braces e.g. key={{variablename}}. Form encoding is done automatically by WFBI.
Accessing JSON response data
HTTP response JSON data is automatically parsed and available as part of the response variable, such as http_response_1[json].
 For example
 http_response_1[json][topkey][secondlevelkey][leaf] could be used to access the deepest-level value in the following JSON structure:
1 2 3 4 5 | |
Accessing XML response data
HTTP response XML element tree can in most cases be traversed by tag names, the same as by keys for a JSON structure. Given the following xml:
1 2 3 4 5 6 | |
Then, we can simply use book[author] or book[title] to access the element contents.
Additionally:
- XML attributes are accessed by prefixing them with a
@character - Sequences of identical tags (by name) are accessed using array indexing
- Element (text) content is always named
#text
For example, presuming this XML:
1 2 3 4 | |
Then library[book][1][@author] is used to access "Richard Adams", the second book author. And library[book][1][#text] would give the name, "Watership Down".
Special XML cases
Case 1. When you have a single child element, you will get the element itself. This is due to the nature of XML; there is no way to infer the intent, i.e. element vs. list with single element.
So in effect case such as:
1 2 3 | |
book node as a object property instead of a list. So library[book][@author] is used to access the book author in this case.
Case 2. When you have a simple element that has just text content, no attributes, just the text content is returned. So presuming a simple book name list:
1 2 3 4 | |
Then library[book][1] would return "Watership down". No #text is used.
XML namespaces and entities
Namespace prefixes or entities in XML are not expanded. Consider the following xml:
1 2 3 4 5 6 7 8 9 10 | |
A namespace in tag (or attribute) is simply part of the name. So here, namespaced elements can be accessed simply by including the namespace prefix and the separator with the tag name: library[a:book][a:title] or library[a:book][b:price].
Running integrations
Running manually from the UI
A workflow Logic Action can be run manually using the "Play" button. A results panel will automatically open with lots of information. Arbitrary test input data can also be manually provided via the UI.
Triggering integrations from Interactions
For Workflow Builder customers, a "Custom Action" click action is available in Interaction Builder. Any published integration workflow available in customer's Workflow Builder is selectable for running as a Custom Action.
When a Custom Action runs, all custom data fields and input fields of an interaction are sent to the workflow as parameters in the following kind of JSON payload format:
1 2 3 4 5 6 7 8 9 10 11 | |
This data is then available in WFBI as three variables: formData, variables and clicks. The clicks are sorted in the chronological order they were clicked in, in the interaction that was run.